
Email Templates
Email Templates let you control what the emails the system sends on your behalf actually say and look like. There is one template for each kind of email — the report email, the form or agreement link, the invoice, the payment receipt, the vendor notices — and every company starts with a ready-made default of each kind.
This replaces the old single Report email body template box on Settings → Report
Options. Instead of one plain-text paragraph with one [[firstname]] variable, you now edit a
properly formatted email with a subject, a rich-text body, merge tokens, your logo and your
colours — and you can do the same for every other email the system sends, not just the report
email.
Where to find them
Section titled “Where to find them”- Manage Lists → Email Templates tab. This is the list of every template your company has, with its Description, Type, whether it is the Default for that type, what it is Used by, and when it was Last modified. Click a row to edit it. Use Filter by type to see just one kind. Click Add Template to create another template of a kind.
- Settings → Report Options → Report email template. This dropdown chooses which Report template is your company default, and its Edit button opens that template for editing. Reply-to, BCC, auto-send and the text message template are still edited here.
- Manage Lists → Report Templates → a reporting template’s settings → Report email. Each of your own reporting templates can point at a specific Report email template. The first option, Company default (…), means “use whatever the company default is”.
- Manage Lists → Forms/Agreements → a form or agreement template → Link email. Each form or agreement template can point at a specific Form / agreement link email template, or follow the company default.
So the rule is: an email uses the template the reporting template or form template points at; if it points at nothing, it uses your company default for that kind. If you later change the default, every template that never chose a specific one follows it automatically.
The kinds of email
Section titled “The kinds of email”Every template has a Type that is fixed when it is created. The type decides when the email is sent, who receives it, and which tokens it can use.
| Type | When it is sent | Who receives it |
|---|---|---|
| Report | When a completed report is emailed — automatically on completion if Auto email reports on completion is on, or when you click Send Report / Resend Report on the report. | Each property contact with Receive Reports switched on and an email address. One email per contact. |
| Task | Never on its own. It is the starting text for a task: in a task’s Email & text fields, Use template copies the template’s subject and body into that task, which you can then edit. The task is only emailed when you send it by hand. If the task’s subject or body is blank, this template fills it in — but only once someone at your company has opened this template and clicked Save. Until then, a task with a blank subject or body sends no email. | The property’s report contacts, one email each. |
| Form / agreement link | When you click Send (or Resend fresh link) for a form or agreement from a property’s Forms & Agreements tab. | The contact(s) you chose in the Send dialog, one email each. |
| Signed agreement copy | When an agreement is fully signed — as soon as the customer signs, or after you countersign if the template requires it. The signed PDF is attached. | The person who signed, and the contact the agreement was sent to, each separately. |
| Invoice | When you send an invoice from HWIT Invoicing. The body of this email is the invoice document, with the PDF attached. | Each invoice contact on the property, one email each. |
| Payment receipt | When you click Email receipt after recording a payment, or on a payment’s row. The paid invoice PDF is attached. It is never sent automatically. | Each invoice contact on the property, one email each. |
| Vendor portal link | When a staff member sends a vendor their portal link from the app, and when a vendor asks for a fresh link from the portal page itself. | The vendor. |
| Vendor assignment | When a report or task is assigned to a vendor. (The vendor’s text message is unchanged by templates.) | The vendor. |
| Vendor work notice | When a job a vendor has been given on a rental booking is moved or cancelled. | The vendor. |
| General email | A starting point for Send Email to Contacts on a property. Load template fills the drawer with the template’s subject, body and files; you can then edit before sending. | The contacts you tick in that drawer, one email each. |
| Price change letter | When you click Email customers on Planning → Price → History for an effective date. It tells each customer what their rates will be. See Price Planning. | The contacts you tick, one email each. Each email lists only that property’s changes. |
| New lead received | When a new lead arrives from your website, by email or by webhook. A lead you add yourself sends nothing. See Intro to Leads. | Your company’s primary user (or the company email if there is none). |
| Lead follow-up reminder | On the morning of a lead’s follow-up date, about 7am company time. One email lists all of that person’s leads due that day. Closed and converted leads are skipped. | The person the lead is assigned to, or the primary user if nobody is assigned. |
| Visit-day notice | At about 7am company time on the day of a visit, for schedules with Send the customer a notice on each visit day ticked. One per property per day. The subject line is also sent as the text message, so keep it short and start it with your company name. See Visit-Day Notices. | The property’s contacts with Receive Reports on: by email if Send reports by email is on, by text if Send reports by text is on. |
| Couldn’t create a lead | When an email sent to your Leads address cannot be turned into a lead. The original message is included so you can add the lead by hand. | Your company’s primary user. |
Every email goes to one person at a time. Even when three contacts receive a report, each gets their own copy, with their own first name merged in. That is why the Recipient tokens below always mean “the one person this particular email is going to”.
Editing a template
Section titled “Editing a template”Click a row on the Email Templates tab (or Edit next to any template dropdown). The editor opens as a full-width drawer with the email on the left and a live Preview on the right.
Description is the name that appears in every template dropdown, so make it something your staff will recognise (“Report email — standard”, “Agreement link — annual contract”). It is required. Type is shown but cannot be changed after the template is created.
Subject is the email subject line. You can use tokens in it (see below). Block tokens such as the button or logo do nothing in a subject.
Body is a rich-text editor — headings, bold, italic, underline, bulleted and numbered lists, and links. Above it you’ll find:
- Insert token… — a menu of the tokens this type of email can use, grouped by what they describe. Pick one and it is dropped in where your cursor is. The menu only offers tokens that are valid for this type, so if you only ever insert from here you cannot pick a wrong one.
- Edit HTML source — tick this to see and edit the raw HTML instead of the formatted view.
This is for people who are comfortable with HTML or want to paste a design from elsewhere.
Only supported formatting is kept: styles, images and scripts are removed when you save, and
the preview shows exactly what will be kept. Links survive, including
mailto:andtel:links, so this is the place to make a phone number tappable or add a link to your website.
Layout controls the frame the body sits in — the grey page, the white card, your company name line and the footer. These are the settings:
- Show company logo — puts the logo from your Company Settings at the top of the card.
- Header color and Background color — colour pickers for the header text and the page behind the white card, so the email can match your branding.
- Button color and Button label — only shown for types that have a button (Report, Form / agreement link, Vendor portal link). The label can contain tokens, e.g. “Open your {{form.kind}}”.
- Footer text — a line of your own under the body.
The Invoice and Payment receipt types have no layout section. Those emails are the invoice document, so there is no separate frame to style.
Preview on the right updates a moment after you stop typing. It is rendered by the same process that sends real emails, using sample values and your company’s real name and logo, so what you see is what a recipient gets. Send test to me emails the current draft to your own login address so you can check it in a real mail client.
Underneath the preview you may see two kinds of note:
- Tokens this email cannot fill — you typed a token that is not valid for this type (or misspelled one). It is listed here, and it will be blank in the sent email. Fix it before you save.
- Worth checking — friendly reminders that never stop you saving: there is no button or link so the recipient has no way to open it; the invoice itself is not in the body; the subject is empty. You are allowed to remove the button if you really want to — the note just makes sure it isn’t an accident.
Attachments (General email only) — files that go with the email every time the template is loaded, for example a storm checklist or a portal guide. Click Attach files to add up to 3 files (5 MB in total), or ✕ to remove one. When someone clicks Load template on Send Email to Contacts, the files are added for them, and they can still remove them for that one email.
Nothing is saved until you click Save. Cancelling or closing the drawer discards your edits, so a half-finished email never goes live.
Set as default makes this template the one your company uses for its type whenever a form or reporting template hasn’t chosen a specific one. Save your changes first — the button is disabled while you have unsaved edits. The current default shows a Default badge.
Delete removes a template permanently. It is greyed out, with the reason beside it, when the template cannot be deleted:
- Default for … — set another default first. Every type must always have a default.
- In use — forms: 2, report templates: 1. A form template or reporting template points at it. Point them somewhere else first.
Guide to tokens
Section titled “Guide to tokens”A token is a short code inside double curly braces, such as {{contact.firstname}}, that is
swapped for real information when the email is sent. You write the template once; each recipient
sees their own details. If you have used tokens in Forms & Agreements, these work the same way and
share the same names wherever the two overlap.
Three things to know first:
- Use the Insert token… menu rather than typing. A misspelled token comes out blank in the email. The preview warns you about any token it cannot fill, so look for that warning before you save.
- Each type of email has its own set. A Report email knows about the report; an Invoice email
knows about the invoice. Asking an Invoice email for
{{report.title}}gives you nothing. The “Available in” column below tells you where each group works. - Block tokens sit on their own line. The button, the logo, the invoice document and your signature are not words — they are whole pieces of the email. Put each on a line by itself. In a subject line they render as nothing.
General
Section titled “General”| Token | Fills in | Available in |
|---|---|---|
{{currentdate}} | Today’s date, written like 03-Oct-2026 (the same way Forms & Agreements shows it) | All types |
Company
Section titled “Company”Your company’s details, as entered on Company Settings.
| Token | Fills in | Available in |
|---|---|---|
{{company.companyname}} | Your company name | All types |
{{company.coemail}} | Your company email | All types |
{{company.cophone}} | Your company phone | All types |
{{company.companyaddress}} | Your company address | All types |
{{company.logo}} | Your company logo as an image (block — own line) | All types |
Recipient
Section titled “Recipient”The one person this email is being sent to. Because every email goes to one contact, these are always that contact’s own details.
| Token | Fills in | Available in |
|---|---|---|
{{contact.firstname}} | Their first name | Report, Task, Form / agreement link, Signed agreement copy, Invoice, Payment receipt, General email, Price change letter |
{{contact.lastname}} | Their last name | same |
{{contact.fullname}} | Their full name | same |
{{contact.emailaddress}} | The email address it is going to | same |
If the contact has no first name on file, “Hello {{contact.firstname}},” tidies itself up to “Hello,” — the stray space before the comma is removed.
Property
Section titled “Property”The property (customer record) the email is about. These are the same tokens Forms & Agreements use.
| Token | Fills in | Available in |
|---|---|---|
{{customer.customername}} | The legal first and last names of every Property Contact on the property, joined with “and” (“Kim Smith and Joey Smith”) | Report, Task, Form / agreement link, Signed agreement copy, Invoice, Payment receipt, General email, Price change letter |
{{customer.propertyname}} | The property’s name, as entered on the property record | same |
{{customer.address}} | The property address | same |
{{customer.mailingaddress}} | The mailing address | same |
{{customer.keyid}} | The key ID | same |
{{customer.visitrate}} | The property’s Visit Rate (the per-visit price), as a plain number | same |
Report
Section titled “Report”| Token | Fills in | Available in |
|---|---|---|
{{report.title}} | The report’s title | Report, Task |
{{report.date}} | The report date | Report, Task |
{{report.inspector}} | The name of the person who did the visit | Report, Task |
{{report.aisummary}} | A short summary of the report for the owner, written by AI. See AI Report Summary | Report only |
{{report.url}} | The web link to the published report, as plain text | Report only |
{{report.button}} | The “Open Report” button (block — own line). Its label and colour come from the Layout settings | Report only |
A task has no report link, so {{report.url}} and {{report.button}} are not offered for the
Task type.
| Token | Fills in | Available in |
|---|---|---|
{{visit.date}} | The day of the visit, in your company’s date format | Visit-day notice |
{{visit.inspector}} | The name of the person assigned to the visit (the day’s first visit, if there are several) | Visit-day notice |
Weather forecast
Section titled “Weather forecast”| Token | Fills in | Available in |
|---|---|---|
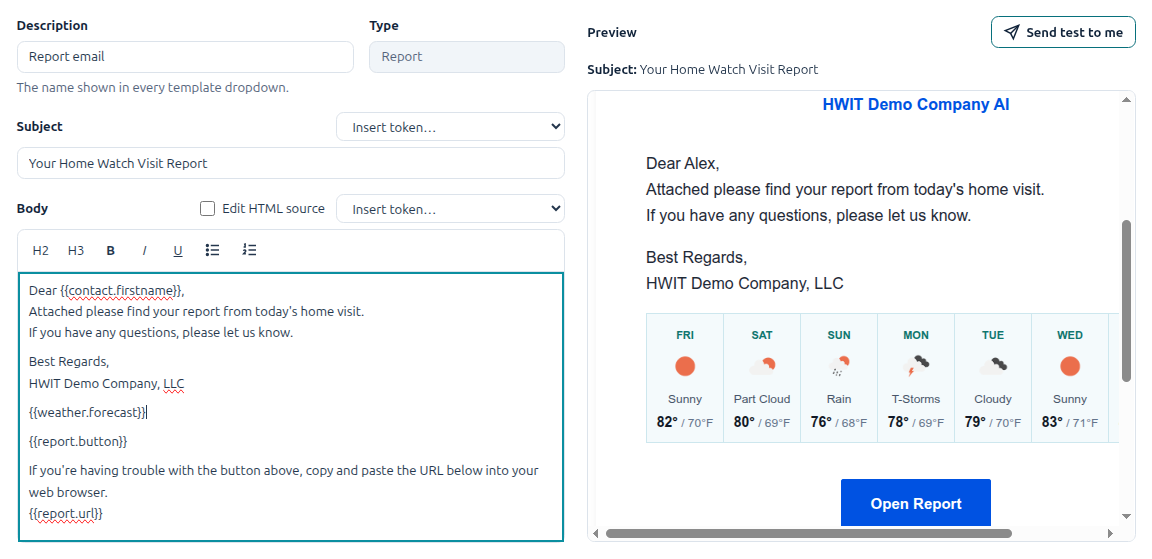
{{weather.forecast}} | The property’s weather forecast — one box per day, up to 7 days, each with the day, a weather picture, the conditions, and the high and low temperature (block — own line) | Report, Task, General email |
To add it:
- Open the Report, Task or General email template.
- Put your cursor on an empty line where you want the forecast.
- Open Insert token… and choose it under Weather forecast.
- Check the Preview, then save.
Good to know:
- It is the forecast at the moment the email is sent. It is not the weather recorded in the report. If you send the email a day after the visit, the customer sees the forecast from that day on.
- Temperatures are in °F if your company address is in the US, and °C everywhere else.
- If the property has no map location, or the forecast cannot be fetched, the token shows nothing and the email still goes out.
- The Preview shows a sample week, not the real forecast.
Open issues and upcoming visits
Section titled “Open issues and upcoming visits”Use these in a General email to give each customer a short summary of their own property. Each goes on a line by itself.
| Token | Fills in | Available in |
|---|---|---|
{{issues.list}} | A table of the property’s open issues that the customer can see: the name, the due date and the status | General email |
{{visits.next30}} | A table of the property’s visits in the next 30 days: the date and the title | General email |
Good to know:
- Each customer sees only their own property.
- If there is nothing to show, the token shows nothing.
- Only issues marked as visible to the customer are listed.
Price change
Section titled “Price change”| Token | Fills in | Available in |
|---|---|---|
{{price.effectivedate}} | The date the new rates start | Price change letter |
{{price.item}} | The first item that changes | Price change letter |
{{price.oldrate}} | Its current rate | Price change letter |
{{price.newrate}} | Its new rate | Price change letter |
{{price.changes}} | A table of every change for the property on that date: item, current rate and new rate (block — own line) | Price change letter |
If a customer has more than one change, use {{price.changes}}. It lists them all in one email.
| Token | Fills in | Available in |
|---|---|---|
{{form.name}} | The form or agreement’s template name | Form / agreement link |
{{form.kind}} | The word “form” or “agreement”, whichever it is | Form / agreement link |
{{form.link}} | The customer’s personal link, as plain text | Form / agreement link |
{{form.expires}} | The date the link stops working | Form / agreement link |
{{form.button}} | The button that opens the link (block — own line) | Form / agreement link |
Signed agreement
Section titled “Signed agreement”| Token | Fills in | Available in |
|---|---|---|
{{signed.templatename}} | The agreement’s template name | Signed agreement copy |
{{signed.signername}} | The customer’s name as they signed it | Signed agreement copy |
{{signed.signeddate}} | When the customer signed | Signed agreement copy |
{{signed.countersignername}} | Who countersigned for your company (blank if nobody) | Signed agreement copy |
{{signed.countersigneddate}} | When they countersigned (blank if nobody) | Signed agreement copy |
{{signed.statement}} | A ready-made sentence: “You signed it on …” or “You signed it on …, and … countersigned it for … on …”, whichever applies | Signed agreement copy |
Invoice
Section titled “Invoice”| Token | Fills in | Available in |
|---|---|---|
{{invoice.number}} | The invoice number | Invoice, Payment receipt |
{{invoice.date}} | The invoice date | Invoice, Payment receipt |
{{invoice.duedate}} | The due date | Invoice, Payment receipt |
{{invoice.total}} | The invoice total | Invoice, Payment receipt |
{{invoice.balance}} | The balance still owing | Invoice, Payment receipt |
{{invoice.currencysymbol}} | Your currency symbol | Invoice, Payment receipt |
{{invoice.paylink}} | The online payment link, as plain text (when one exists) | Invoice, Payment receipt |
{{invoice.pdfname}} | The file name of the attached PDF | Invoice, Payment receipt |
{{invoice.paybutton}} | The “Pay Online Now” button (block — own line) | Invoice, Payment receipt |
{{invoice.document}} | The whole invoice — header, lines, totals, payments — exactly as it appears on the PDF (block — own line) | Invoice, Payment receipt |
Payment
Section titled “Payment”| Token | Fills in | Available in |
|---|---|---|
{{payment.amount}} | The amount paid | Payment receipt |
{{payment.date}} | The payment date | Payment receipt |
{{payment.method}} | How it was paid | Payment receipt |
Vendor, Assignment, Vendor portal and Work change
Section titled “Vendor, Assignment, Vendor portal and Work change”These groups appear only in the three vendor types.
| Token | Fills in | Available in |
|---|---|---|
{{vendor.fullname}} | The vendor’s name | Vendor portal link, Vendor assignment, Vendor work notice |
{{assignment.title}} | The title of the report or task assigned | Vendor assignment |
{{assignment.customer}} | The property it is for | Vendor assignment |
{{assignment.date}} | Its date | Vendor assignment |
{{assignment.kind}} | The word “report” or “task” | Vendor assignment |
{{portal.link}} | The vendor’s portal link, as plain text | Vendor portal link |
{{portal.button}} | The button that opens the portal (block — own line) | Vendor portal link |
{{work.label}} | What the job is | Vendor work notice |
{{work.property}} | The property it is at | Vendor work notice |
{{work.change}} | The word “rescheduled” or “cancelled” | Vendor work notice |
{{work.was}} | When it was previously scheduled | Vendor work notice |
{{work.now}} | When it is now scheduled (blank if cancelled) | Vendor work notice |
{{work.statement}} | A ready-made sentence describing the change — ”… has MOVED. It was …; it is now …” or ”… has been CANCELLED.” | Vendor work notice |
{{work.followup}} | A ready-made sentence saying what to do next — “Please contact … if that does not work.” or “No visit is needed. Please contact … with any questions.” | Vendor work notice |
User — your personal email signature
Section titled “User — your personal email signature”| Token | Fills in | Available in |
|---|---|---|
{{user.signature}} | The sending user’s own email signature block — name, title, phone, links — exactly as they set it up (block — own line) | Report, Task, Form / agreement link, Vendor portal link, Vendor assignment, General email |
This is the one token that is about your staff rather than the customer or the company. Each user writes their own signature, once, and the token drops it in wherever it is used.
Setting up your signature. Open the profile menu (your name, top right) → Your profile →
Email signature → edit → Save signature. The signature editor is the same rich-text
editor as the template body, with an Edit HTML source toggle if you want to add links — your
website, a mailto: email link, a tel: phone link. Coloured text is not supported; keep it to
plain formatting.
It is per company. A user who belongs to more than one company sets a signature in each, because the title and phone number they sign with usually differ. Switch to the other company and set it again.
Who “the user” is depends on the email. The system picks the person who most naturally signs that message:
| Whose signature | |
|---|---|
| Report and Task | The report’s assignee — the person who did the visit |
| Form / agreement link | The staff member who clicked Send. A Resend fresh link uses whoever resent it; an automatic retry after a failed send uses the original sender |
| Vendor assignment | The report’s assignee |
| Vendor portal link | The staff member who sent it from the app. When a vendor requests a fresh link themselves from the portal page, nobody sent it, so no signature is added |
| General email | The staff member who clicked Send Email to Contacts |
It is not offered for Invoice, Payment receipt or Signed agreement copy emails, because nobody sends those by hand — there is no natural person to sign them.
If the user has no signature saved, the token renders as nothing — no error, no placeholder, just an empty line. So it is safe to put in a template even if not everyone on your team has set theirs up yet.
It is not in the default templates. A default signs off with “Best Regards,
{{company.companyname}}” — or, if your company had its own report email before templates arrived,
with whatever sign-off was typed into it, often including a phone number and email address. That
typed sign-off is not your signature: changing your profile does not change it, and adding
{{user.signature}} as well gives the email two. Edit the template, delete the typed sign-off, and
put {{user.signature}} on its own line in its place. Step by step:
Change the Signature on Your Emails.
Frequently asked questions
Section titled “Frequently asked questions”Will my old report email text be lost?
No. Your existing Report email subject line and Report email body template were copied
into your default Report template (and your Task template), with
[[firstname]] converted to {{contact.firstname}} and your paragraphs kept. The “trouble with the
button” line and the report link, which used to be fixed, are now part of the body so you can
reword or remove them. If your company had never typed anything in those boxes, you start with the
standard “Dear {{contact.firstname}}, Attached please find your report…” text.
Can I have different emails for different reporting templates? Yes. Add a second Report template on the Email Templates tab, then open the reporting template’s settings and choose it under Report email. Reporting templates left on Company default keep using the default. The same works for forms and agreements with Link email — for example a different email for your annual agreement than for your intake form.
Why did my token show up blank?
Either it is misspelled, or it is not valid for that type of email (an Invoice email cannot fill
{{report.title}}), or there was genuinely nothing to fill (a {{user.signature}} for someone with
no signature saved). The preview lists every token it cannot fill under Tokens this email cannot
fill — check that before you save, and insert tokens from the Insert token… menu rather than
typing them.
Can I put my logo in the body?
Yes — insert {{company.logo}} on its own line wherever you want it. The logo itself comes from
Company Settings. If you just want it at the top of the email, turn on Show company logo in
the Layout section instead. You cannot upload other images into a template.
Why is the Delete button greyed out? The reason is written next to it. Either the template is the default for its type (make another template the default first) or a form template or reporting template points at it (change those to another template first). Every type must always have at least one template, which is its default.
Does this change the text message? No. The Report text message template on Settings → Report Options is still where the SMS text lives, and the vendor’s assignment text message is unchanged too. Email Templates only cover emails.
Can I see what the customer will see? Yes. The Preview on the right of the editor is rendered by the same process that sends real emails, using sample values, and updates as you type. For a real check in your own mail client, click Send test to me — it emails the current draft to your login address.
What happens on mobile? Emails are sent by the system, not by the phone, so a report completed and sent from the mobile app uses your Email Templates in exactly the same way. On the phone, the report’s email fields are no longer pre-filled from the old company text, and a task gains the same Use template picker. The mobile update arrives with the next regular app release. One thing to know: a task body saved on the web contains formatting, and the current mobile app shows that as raw HTML in its plain-text field.
Where do I set my signature, and who sees it?
Set it under your name (top right) → Your profile → Email signature. It only ever appears
in an email whose template contains {{user.signature}}, and only when you are the natural sender
of that email — the assignee of a report, or the person who clicked Send on a form. Nobody else can
edit your signature, and if you work for more than one company you set one in each.
What if the assigned technician has no signature? The token simply prints nothing, and the email still goes out. If you want every report signed, ask each technician to set theirs up under Your profile → Email signature, or keep a company sign-off (“Best Regards, {{company.companyname}}”) in the template instead.
Can I show the weather in the report email?
Yes. Add {{weather.forecast}} to your Report or Task template. It shows the property’s
forecast for the coming days, as it is when the email is sent — see Weather
forecast above.
Does a template change affect emails I’ve already sent? No. Each email is rendered at the moment it is sent, and a copy of exactly what went out is kept. Changes apply to future sends only.
I pasted my own HTML and some of it disappeared.
That is expected. Only supported formatting is kept — headings, bold, italic, underline, lists,
links and tables. Inline styles, images and scripts are removed when you save. The preview shows
exactly what will survive, so check it before saving. Use the Layout settings for colours and
{{company.logo}} for your logo instead.