HWIT Reporting - Building and Managing Templates
Creating a New Template
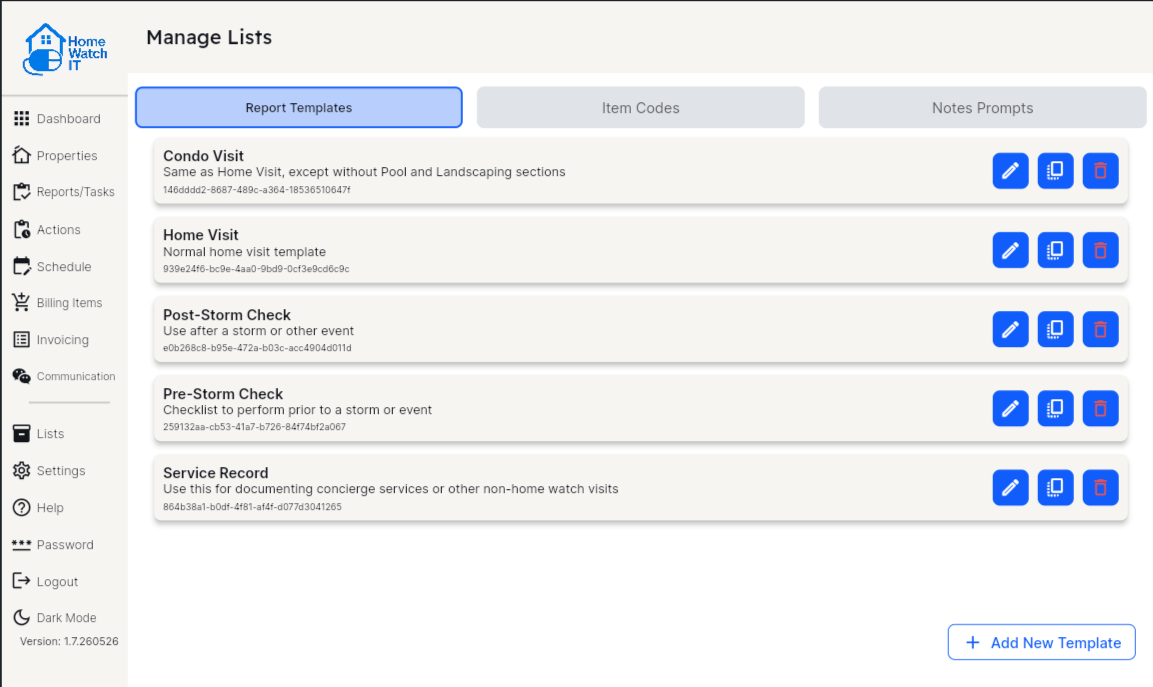
Section titled “Creating a New Template”- In the desktop app, go to Manage Lists → Report Templates.
- Tap New Template. Or, you can simplify things by copying an existing template and then editing the new copy.
- Give the template a clear name — for example, Standard Weekly Check or Luxury Condo — Full Inspection.
- Optionally add a description to help your team know when to use it.
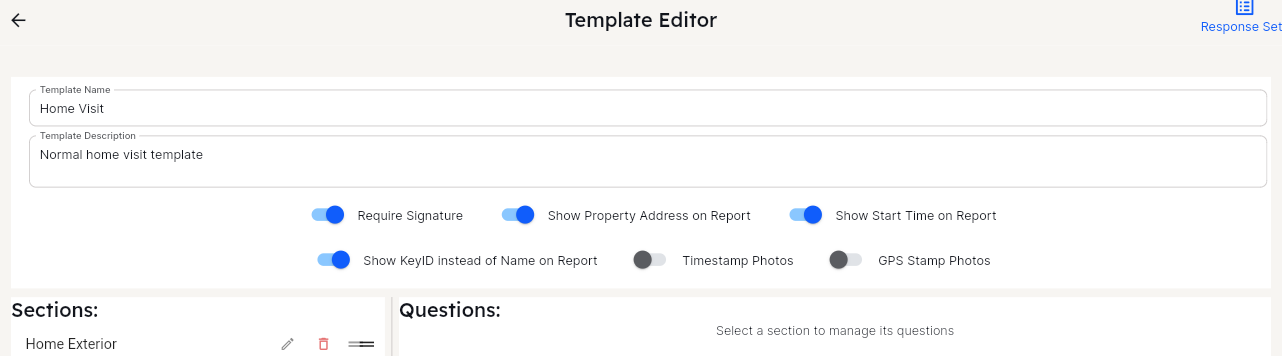
- Once the template is saved, tap the gear icon in the Template Editor to open Report Settings — this is where you set the report header color, the technician name label, and options like requiring a signature, showing the property address or start time, and stamping photos. See Report Settings below.
- Choose whether to allow unanswered questions — see below.
- Tap Save. The template starts as a Draft — it won’t be available to assign to schedules yet.
Report Settings
Section titled “Report Settings”Report-level options — the ones that control how the finished report looks and behaves, rather than what questions it asks — live together in one place. Open the template and tap the gear icon to open Report Settings.
Report Header Color
Section titled “Report Header Color”Pick the background color for the banner at the top of the client’s report — the same color appears in both the web view and the downloaded PDF. A preview in the panel shows exactly how it will look, including automatically switching the banner text between white and dark so it stays readable no matter which color you pick.
Note: This changes only the top banner, not every accent color throughout the report.
Technician Name Label
Section titled “Technician Name Label”By default the report shows Taken By above the technician’s name. If your business prefers different wording — Inspector, Technician, Completed By — type it here and it replaces the default on every report generated from this template.
Report Options
Section titled “Report Options”- Require Signature — a signature is required before the report can be completed.
- Start Time on Report — shows the visit’s start time on the client’s report.
- Property Address on Report — shows the property’s address on the client’s report.
- Include Summary — shows the four-tile summary block at the top of the report.
- Timestamp Photos — burns the date/time into the corner of every photo as it’s captured. This will also automatically include your company logo as a watermark in the corner of the photo.
- GPS Stamp Photos — burns the GPS coordinates into the corner of every camera photo as it’s captured. This will also automatically include your company logo as a watermark in the corner of the photo. If you select a photo from your Gallery, the GPS stamp of the original photo will be embossed rather than your actual device’s location.
- KeyID instead of Name on Report — shows the customer’s KeyID instead of their name, for extra privacy.
- Allow unanswered questions — see Allowing Unanswered Questions below.
Every change here saves immediately — there is no separate Save button.
Adding Sections
Section titled “Adding Sections”Sections organize your questions into logical groups. Think of them as pages or tabs — Exterior, Kitchen, Living Areas, Security, etc.
- Open your template and tap Add Section.
- Enter the section name.
- Drag sections into the order you want them to appear during the inspection.
Tip: The technician sees one section tab at a time on their phone. Keeping section names short helps — they display as tabs across the top of the screen.
Adding Questions
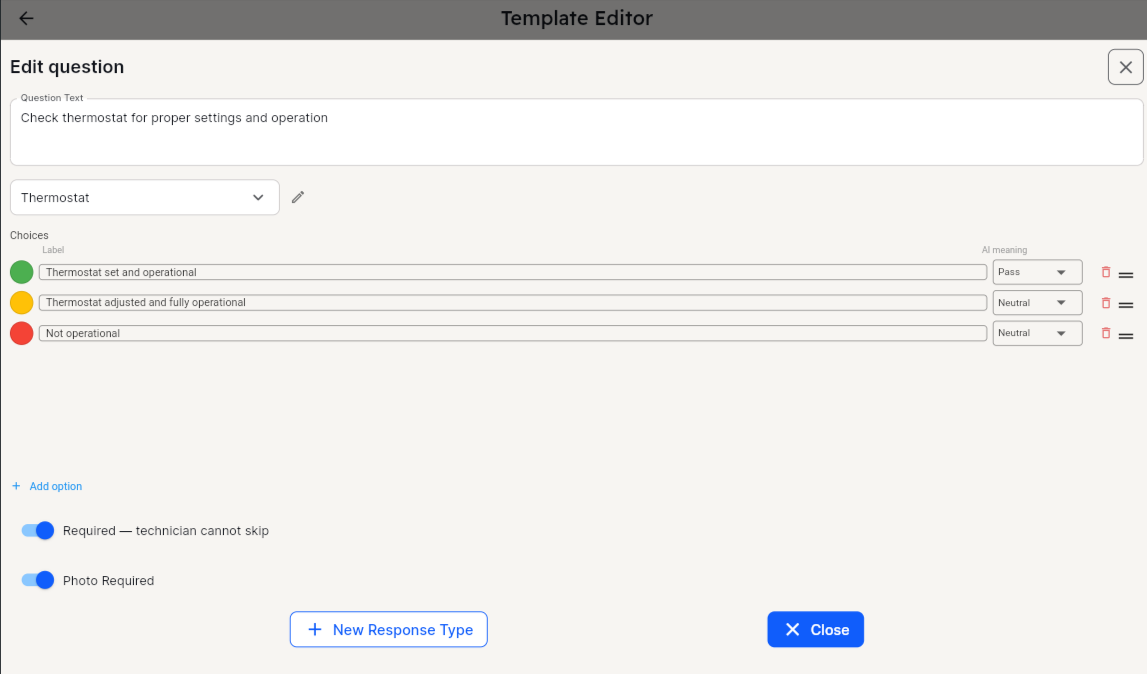
Section titled “Adding Questions”- Tap a section to open it, then tap Add Question.
- Write the question text — phrased as a statement or question the technician will respond to. For example: Smoke detector functional or Are all windows locked?
- Choose a Response Type (see below).
- Mark the question Required if the technician must answer it before completing the report.
- Tap Save.
Repeat for each question. Drag questions to reorder them within the section.
If a question only applies some of the time, you can hide it until an earlier answer calls for it — see Conditional Questions below.
To put a picture on the report — a chart, a diagram, a reference photo — see Adding an Image to a Display Only Question.
Allowing Unanswered Questions
Section titled “Allowing Unanswered Questions”By default a technician must answer or skip every question before the Complete Report button appears. On a long template where much of it will not apply to every visit, that means a lot of skipping.
Turning on Allow unanswered questions in Report Settings lets the technician complete the report with questions left untouched. Anything left blank simply does not appear on the client’s report — the same way a skipped question behaves today.
A few rules still apply, so the option cannot be used to bypass your standards:
- Required questions must still be answered. They can never be skipped or left blank, whether or not this option is on.
- A photo is only required once the question is answered. A question left blank or skipped does not need its photo.
- Once the technician touches a question, they must finish it. Adding a photo or typing a note means the question needs an answer before the report can be completed. If you want the technician to record a comment with no rating attached, use an Open Text question instead.
Tip: Section tabs show a red ★ on any section that still holds an unanswered required question, so the technician can see at a glance where to go.
Response Types
Section titled “Response Types”When you add a question, you choose how the technician will answer it.
Built-in Response Types include: Checklist, Yes/No, Yes/No (where No is the positive response), Pass/Fail, or an Open Text field to fill in. A special Response Type is: Display Only, which puts content on the customer’s final report without asking the technician for anything. You would use this to add a Disclaimer or other embedded notes in the final report.
A Display Only question takes no answer, and the technician cannot attach a photo to it. It can, however, carry an image of your own that prints on the report along with its text — see Adding an Image to a Display Only Question below.
Two custom types let you build your own list of answers: Multi-choice, where the technician picks exactly one option, and Multi-select, where they can pick as many as apply. See Custom Multiple Choice below.
Custom Multiple Choice
Section titled “Custom Multiple Choice”Need more than two options? Create a custom response Set. You can edit the response set right from the question screen — remember that this will affect ALL templates! To learn more about adding/editing Response Sets specifically please see below.
When you create the response set you choose Multi-choice or Multi-select:
- Multi-choice — the technician picks one answer from the list. Use it for a rating or a status: Excellent / Good / Needs Attention.
- Multi-select — the technician can pick as many as apply. Use it when several answers can be true at once: Which appliances were run? or Which areas were serviced?
On the finished report a multi-select answer shows one coloured badge per selection, each in its own colour — so if a single choice is marked as an issue, the report is still flagged even when the others are fine.
Note: A custom response set is available to all templates in your company. Build it once, use it everywhere.
Adding an Image to a Display Only Question
Section titled “Adding an Image to a Display Only Question”A Display Only question can carry an image that prints on the client’s report. Use it when a picture explains something better than a sentence: a seasonal watering-frequency chart, a diagram, a reference photo showing where a label is found.
- Open the template and tap the pencil beside the Display Only question.
- Find Report image in the dialog and tap Add image.
- Choose the picture from your computer. It uploads and a preview appears.
- Use Replace to swap it, or Remove to take it off the question.
Your changes save as you make them — there is no separate Save button.
The Report image field only appears on Display Only questions. Other response types do not have it, because the image is content for the report rather than an answer.
The text is optional
Section titled “The text is optional”A Display Only question can have text, an image, or both. If the picture says everything, leave the question text empty and the report shows just the image, with no blank line above it.
Where it appears
Section titled “Where it appears”- On the report — beneath the question’s text, at full width. The client can click it to open it full size, which matters if it is a chart they need to read.
- In the PDF — the same image, sized to the page.
- For the technician — on the question card as they work, so they can see what the client will get. Tapping it opens it full screen.
Note: The image is part of your template, not something the technician takes. They cannot change or delete it while doing a report.
Keep the file small
Section titled “Keep the file small”Use images under 3 MB — larger files are refused. Every image on a triggered question is embedded in the PDF the client receives, so a handful of large ones make for a slow download. A screenshot or a photo straight from a phone is normally well under the limit.
Important: Changing or removing an image never changes a report that is already finished, the same as editing any other part of a template.
Conditional Questions
Section titled “Conditional Questions”Sometimes a question only matters depending on an earlier answer. Rather than asking the technician to skip past questions that do not apply, you can hide them until they are relevant.
For example: Is there a pool? → if Yes, show Pool water level checked and Pool equipment running. If No, the technician never sees them.
You can make a single question conditional, or a whole section.
A conditional Display Only question is a useful pairing: it lets you show a note — or an image, see Adding an Image to a Display Only Question — only when a particular answer calls for it. Irrigation clock changed for the season? → if Yes, show the seasonal watering chart.
Setting a condition on a question
Section titled “Setting a condition on a question”- Open the template and tap the pencil beside the question you want to hide.
- Find the Visibility row near the bottom of the dialog. It reads Always shown until you set a rule.
- Tap it. A panel slides in from the right.
- Choose the controlling question from the dropdown. The list shows only questions that can legally control this one, closest first.
- Tick one or more answers that should reveal this question.
- Tap Done.
The Visibility row now reads something like Shown when “Is there a pool?” is Yes. Your changes save as you make them — there is no separate Save button.
To remove a condition, open the panel again and choose Always show.
Setting a condition on a section
Section titled “Setting a condition on a section”Sections work the same way, and hiding a section hides every question inside it.
- On the Sections list, tap the pencil beside the section.
- Set the condition exactly as above. You can also rename the section from this screen.
Tip: Use a section condition when a whole area may not apply — a pool, a guest house, a boat dock. Use a question condition for one-off follow-ups.
The rules
Section titled “The rules”The template editor only offers you valid choices, so you cannot build a broken condition. It helps to know why an expected question is missing from the dropdown:
- The controlling question must have a list of answers — Checklist, Yes/No, Pass/Fail or a custom Multi-choice set. Open Text and Display Only cannot control anything, and neither can Multi-select, because it can hold several answers at once.
- It must come earlier in the template — an earlier section, or higher up the same section. The technician has to reach the controlling question first.
- No chains. A controlling question cannot itself be conditional, and cannot sit inside a conditional section. One level only.
- At least one answer must be ticked. A condition with no answers would hide the question permanently, so it is not allowed.
What the technician sees
Section titled “What the technician sees”- The question or section simply is not there until the condition is met. Answer the controlling question and it appears immediately — no need to leave and re-enter the report.
- Hidden sections drop out of the tab bar, and Next/Previous skips over them.
- An unanswered controlling question keeps the follow-ups hidden. So does a skipped one.
- A hidden Required question does not block the Complete Report button. Only questions the technician can actually see have to be answered.
- It all works offline — nothing here needs a signal.
What the client sees
Section titled “What the client sees”Hidden questions never appear on the finished report — no blank rows, no empty headings. If you put a Display Only note inside a conditional group, it hides along with everything else.
If a technician answers a question and then changes the controlling answer so it hides, their original answer is kept but is not included in the report. Changing the controlling answer back brings it into view again.
Important: Adding a condition never changes a report that is already finished. Reports keep exactly the questions they had when they were completed, so a report you sent last month will not change if you edit the template today.
Reordering and deleting
Section titled “Reordering and deleting”Conditional questions show an arrow icon and are indented in the template editor, so you can see the structure at a glance.
Because the controlling question has to come first, moving things around can invalidate a rule. If you drag a question above the one that controls it, the condition is cleared and a message tells you how many were removed. The question then shows for everyone — nothing is hidden by accident.
Deleting a controlling question clears any condition that pointed at it, and those questions go back to always showing.
Tip: Set your conditions after the template is in the order you want. It saves re-doing rules that a later drag would clear.
Assigning a Template to a Schedule
Section titled “Assigning a Template to a Schedule”Templates don’t do anything on their own — they need to be connected to a schedule so the right form appears when a technician starts an inspection.
- Open the property’s schedule (on the Schedules screen).
- Edit the schedule and select the template from the Report Template dropdown.
- Save the schedule.
From this point forward, every inspection generated from that schedule will use that template.
Cloning a Template
Section titled “Cloning a Template”If you want to start a new template based on an existing one:
- Go to the template you wish to copy/clone on the Templates List.
- Tap Clone icon.
- Give the copy or clone a new name.
- The clone opens as a Draft — edit it however you like before publishing.
Tips for Good Templates
Section titled “Tips for Good Templates”- Keep section names short — they appear as tabs on a small phone screen.
- Order questions the way the technician moves through the property — from the front door through each room and back out. It speeds up the inspection and reduces missed items.
- Use Required sparingly — only mark a question Required if the report is genuinely incomplete without it. Too many required fields frustrates technicians.
- Use color intentionally — green for good, red for problems. Inverted Yes/No is useful for questions where “Yes” means there is an issue
- Reach for a condition before a long “if applicable” list — hiding a pool section on properties without a pool is clearer than asking the technician to skip six questions every visit
- Finish the ordering before setting conditions — a controlling question has to come first, so re-ordering later can clear rules you have already set
Managing Response Sets
Section titled “Managing Response Sets”You can add/edit any of the Response Sets within the system easily. By having Response Sets set at a company level, it makes it easy to update them in one place and use them in many different templates. You can access the Response Sets manager by going to the Template List (Lists/Edit Templates), and clicking the Response Sets icon on the bottom left.
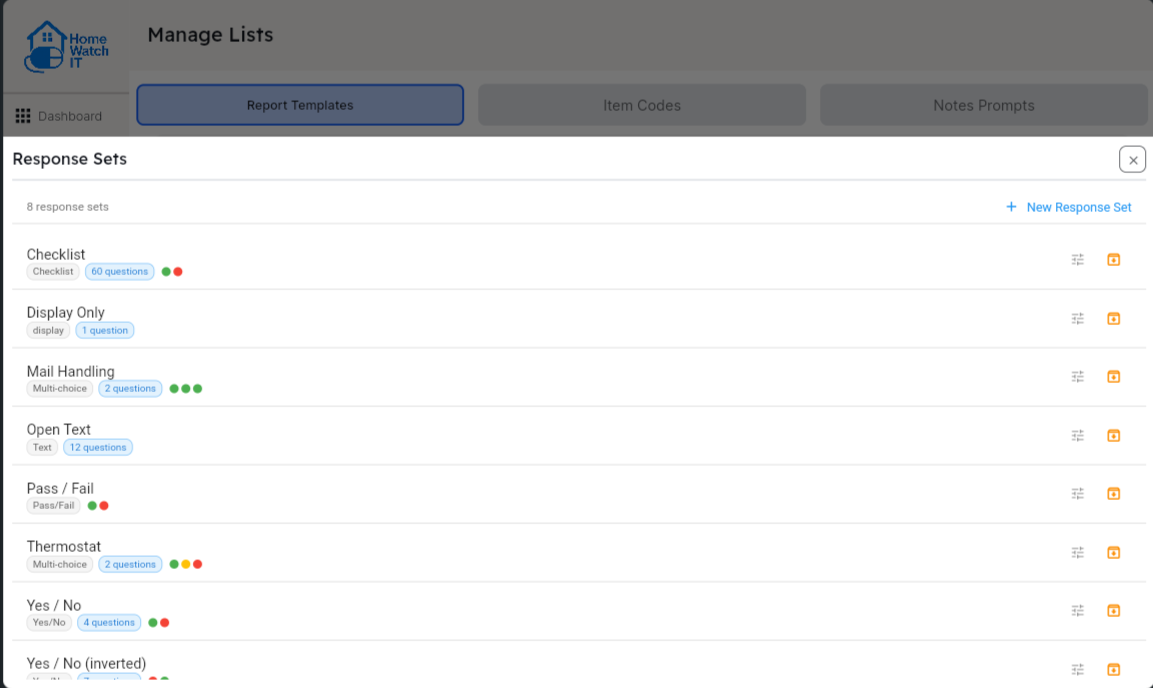
All of your Response Sets display and you can edit, move, or add a new Response Set from this screen. Let’s say you wish to add a new Response Sets to report on the weed growth around a pool lanai. Click +New Response Set.
Give your new Response Set a name, and select the type of list it will be. Most often that is Multi-choice, where the technician picks one answer from your list. Choose Multi-select instead when more than one answer can be true at the same time — the technician then gets tick boxes and can select as many as apply.
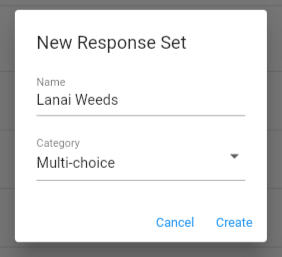
Once you click OK, you will be taken to the editor screen. Click Add New choice as many times as you need to add the different choices available. Enter the descriptions and select the follows
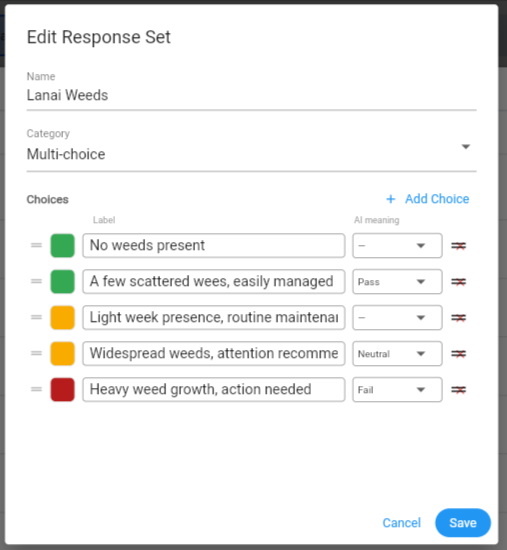
When doing a multi-choice or multi-select list, it is important to also update the “AI Meaning” column as that is what your AI Assistant will use as a reference when completing the report. Let him know which answer to mark when Passing, Failing, or in between by selecting Pass, Neutral or Fail.
Once you Save your new Response Set you will be able to use it on any report template within the system. Should you decide to edit the actual responses available later, just come back to the Response Sets management, update the list, and the new responses will be pushed through all of the templates using this Response Set.