
Building Forms & Agreements
This article covers how to build, preview, publish, and send a Form or Agreement. If you are new to the feature, start with Introduction to Forms & Agreements for the difference between the two and the overall workflow.
Forms and Agreements let you send a customer a secure, personalized web link. The customer opens it in any browser (phone, tablet, or computer), fills in the information or signs the document, and taps Submit. Everything they enter is captured. Anything you mapped to the customer record is saved back automatically, and a neat PDF copy is filed under the customer’s Attachments — no chasing paper.
You build a template once, then send it to as many customers as you like.
Start here: which building block do I use?
Section titled “Start here: which building block do I use?”A template is just a stack of items. There are only three kinds, and picking the right one is most of the job. Read this table before you build anything.
| I want to… | Use | Notes |
|---|---|---|
| Show a heading, instructions, or contract wording | Add Text | The customer reads it. They can’t type into it. |
| Ask one question and save the answer | Add Field | One question, one answer, one place it gets saved. |
| Collect a second owner, spouse, property manager, or contractor | Add Contacts | Never build people out of individual fields. See below. |
Building a template — step by step
Section titled “Building a template — step by step”This is where you design what the form or agreement looks like. Take it slowly; you only have to do it once.
1. Start a new template
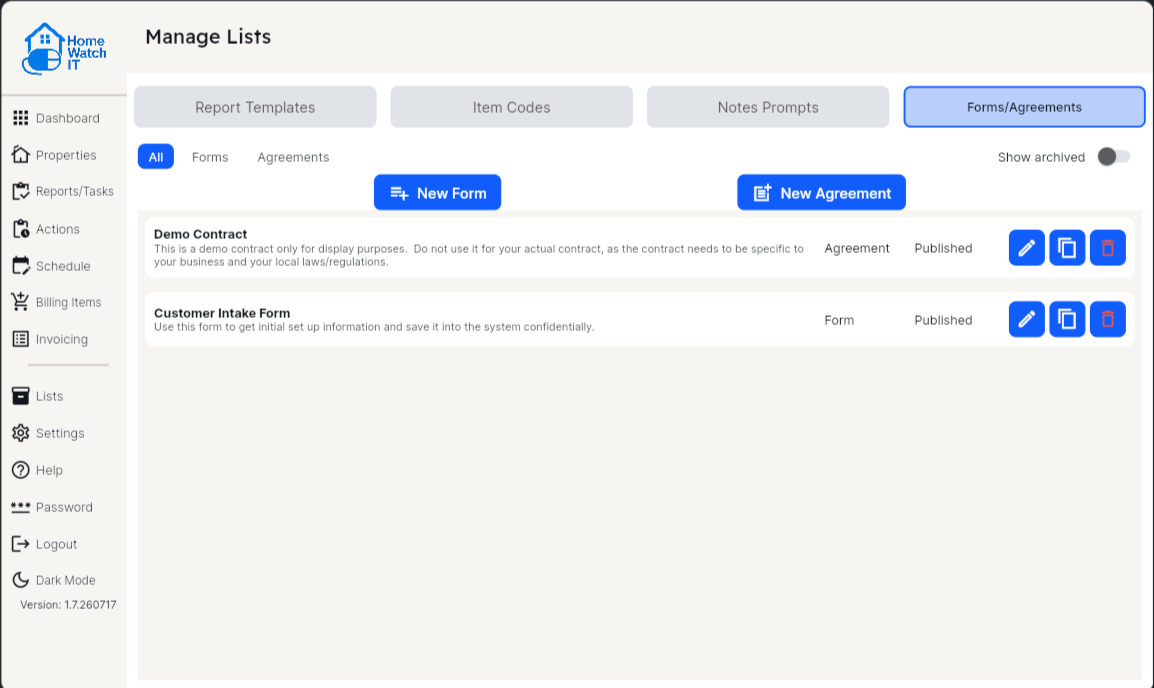
Section titled “1. Start a new template”- Open the Lists screen.
- Click the Forms/Agreements tab.
- Click New Form or New Agreement.
2. Fill in the template settings (the top section)
Section titled “2. Fill in the template settings (the top section)”At the top of the editor you’ll set the basics:
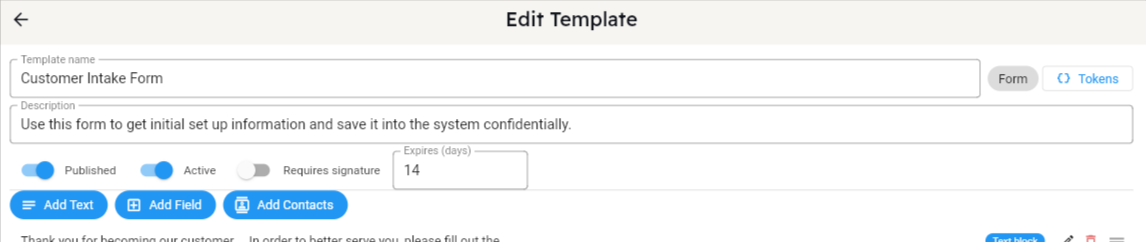
- Template name — the big title the customer sees at the top of their page. Make it something a homeowner would understand (“New Customer Information”), and check there’s no stray space at the front.
- Description — the customer reads this too. It prints as the grey line directly under the title. Write it as a friendly one-line explanation, or leave it blank. It is not a private note to yourself.
- Published — turn this on when the template is finished. Only published templates can be sent.
- Active — leave this on. Turning it off (or using Archive on the template’s row) retires a template you no longer use without deleting it. Archived templates reappear in the list when you tick Show archived.
- Requires signature — turn this on when the customer must sign. It’s normally on for an Agreement and off for a Form.
- Expires (days) — how many days the link stays valid before it expires (14 by default).
- Preview — see exactly what a customer would see, using a real customer’s data, without sending anything or publishing the template first. See Previewing your template below.
- Tokens — a reference list, not a setting. See Text blocks and tokens below. Most templates never need it.
3. What the customer sees at the top of the page
Section titled “3. What the customer sees at the top of the page”Four different things stack up at the top of the customer’s page, and each is edited somewhere different:
| What they see | Where it comes from |
|---|---|
| Your logo, company name, phone and email | Company Settings — the same on every form you send |
| The big title | The template’s Template name |
| The grey line under the title | The template’s Description |
| Any wording of your own | A Text block you add as the first item |
So if you want custom wording at the top of a particular form — a welcome paragraph, instructions, a deadline — add a Text item and drag it to the top.
4. Add your items
Section titled “4. Add your items”Below the settings is the list of items that make up the document. Three buttons add them:
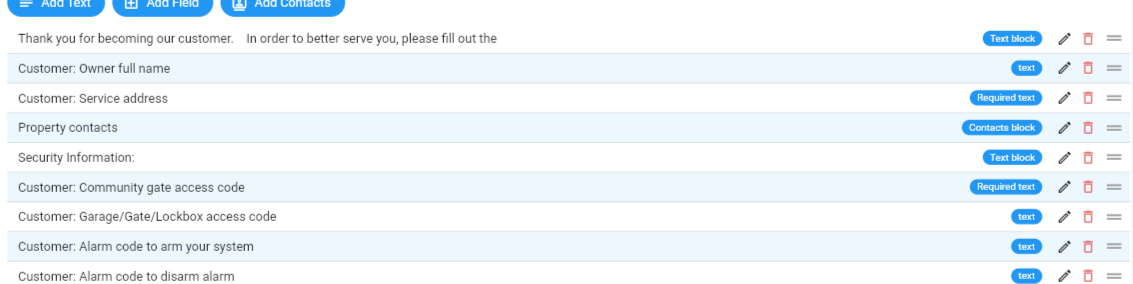
- Add Text — a block the customer reads but does not fill in: headings, instructions, or the wording of your agreement. You can make text bold, add headings, and create lists.
- Add Field — one box the customer fills in (and that can save back to the customer record).
- Add Contacts — the section that shows the customer the people already on their record so they can update them and add new ones.
Drag the handle on the right of any item to reorder it. Click a row (or the pencil icon) to edit it, or the trash icon to delete it.
Use Text items as section headings to break a long form into chunks — “Security Information”, “HVAC”, “Mail Handling”. It makes the customer’s page and the finished PDF far easier to read.
For most intake forms, keep it simple:
- Add Text items for short section headings.
- Add Field items for property details, codes, preferences and notes.
- Add one Contacts block for owners, spouses, managers and service providers.
- Mark anything private as Sensitive.
- Click Preview as you go to check the layout — you don’t need to publish first. Once it’s ready, publish it and do one real send to yourself before sending it to customers.
5. Set up a field
Section titled “5. Set up a field”When you add a Field, you’ll fill in a few things:
-
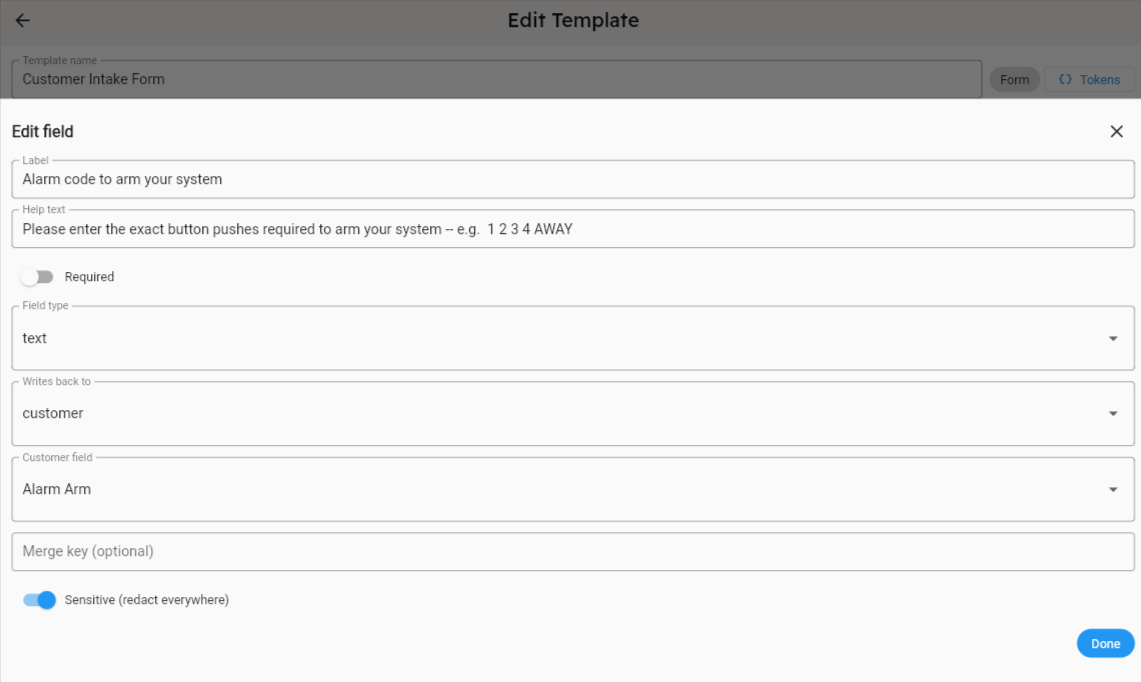
Label — the question the customer sees (e.g. “Front gate code”). This is also the only wording that appears in your notification email, so make every label unique. Two fields both called “Other comments” are impossible to tell apart later.
-
Help text — an optional hint under the label. Use it for examples.
-
Required — the customer can’t submit until they fill it in.
-
Field type — how the answer is typed in:
Type Use for textA short answer on one line textareaA longer, multi-line answer selectA dropdown — you supply the choices dateA date picker emailAn email address (the customer’s browser checks it looks valid) phoneA phone number If a question can only be answered yes or no, use
selectand give it Yes and No as the choices. You’ll get consistent answers instead of “yes”, “Yes please” and “only in winter”. -
Writes back to — the important one. See the next step.
-
Merge key (optional) — leave blank. Advanced only; see Text blocks and tokens.
-
Sensitive (redact everywhere) — for private things like gate codes and alarm passwords. See Sensitive fields.
-
Choices, one per line — only appears when Field type is
select. Type each option on its own line. Aselectfield with no choices is broken; see below.
6. “Writes back to” — always a two-step choice
Section titled “6. “Writes back to” — always a two-step choice”Writes back to tells the system where the customer’s answer gets saved. It is always two dropdowns, and the second one starts empty. Picking the first and forgetting the second is the most common way to break a template.
Step one — pick the destination:
| Choice | Saves the answer to |
|---|---|
| Customer | A field on the customer/property record |
| Note | One of your customer notes |
| Contact | A detail on one specific person you choose at send time |
| None | Nowhere — the answer only appears on the PDF |
Step two — a second dropdown appears. You must pick from it.
- Choose Customer → a Customer field dropdown appears (Customer Name, Property Address, Mailing Address, Key ID, Gate Code, Lockbox, Alarm Provider, Alarm Company Phone, Alarm Password, Alarm Disarm, Alarm Arm, Alarm Notes, Visit Frequency).
- Choose Note → a Category dropdown appears, then a Description dropdown. Pick both.
- Choose Contact → a Contact field dropdown appears (First Name, Last Name, Full Name, Email, Phone, Alt Phone).
A few examples:
| Question | Good write-back choice |
|---|---|
| ”Front gate code” | Customer → Gate Code |
| ”Anything special we should know about the pool?” | Note → the matching note category and description |
| ”Do you agree to these terms?” | None if you only need it on the PDF |
| ”Update Jane’s phone number” | Contact → Phone, then pick Jane when you send |
7. Text blocks and tokens
Section titled “7. Text blocks and tokens”You probably don’t need tokens. If you’re building an intake form — a list of questions for the homeowner to answer — you can skip this whole section. Tokens have nothing to do with collecting information.
What a token actually is: a short piece of code you type inside a Text block that gets swapped for real information when the customer opens their page. It’s a mail-merge. It only fills in things you already know — it never collects anything.
Here’s the whole idea in one example. You type this into a Text block:
This agreement is between {{company.companyname}} and {{customer.customername}},for the property at {{customer.address}}, dated {{currentdate}}.Bob Smith opens his link and reads:
This agreement is between Eye On LBI and Bob Smith, for the property at 12 Ocean Ave, Beach Haven NJ, dated 11-Aug-2026.
You wrote it once. Every customer sees their own details. That’s all tokens do.
The list of tokens is behind the Tokens button at the top right of the template editor. Click any one to copy it, then paste it into your text.
| Token | Fills in |
|---|---|
{{currentdate}} | Today’s date |
{{company.companyname}} | Your company name |
{{company.coemail}} | Your company email |
{{customer.customername}} | The customer’s name |
{{customer.address}} | The property address |
{{customer.mailingaddress}} | The mailing address |
{{customer.keyid}} | The key ID |
{{customer.visitfreq}} | The visit frequency |
Three things to know:
- Tokens only work inside Text items. Typing one into a field’s Label or Help text does nothing.
- A token you get wrong just disappears. There’s no error message — it comes
out blank. So
{{customer.customersname}}(note the stray “s”) silently prints nothing. Always copy from the Tokens list rather than typing from memory, and always preview by sending one to yourself. - Codes and passwords can never be merged. Gate code, lockbox and alarm values
always come out as
XXXin your wording, no matter how you set the question up. This is deliberate and cannot be turned off.
8. Sensitive fields (gate codes, alarm passwords)
Section titled “8. Sensitive fields (gate codes, alarm passwords)”Turn on Sensitive (redact everywhere) for anything private. Sensitive fields behave differently, on purpose:
- On the customer-facing form page they show up blank, with a note that a value is already on file. This keeps secrets off a public web page.
- If the customer leaves it blank, you keep the value you already had.
- If they type a new value, it replaces the old one.
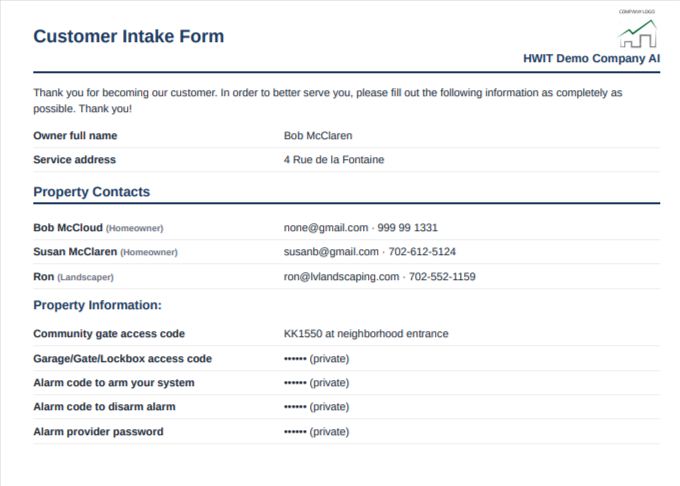
- The saved PDF shows the answer as
•••••• (private)instead of the real value. - Your notification email doesn’t show it either — it just says the field was “changed” or “unchanged”.
Sensitive does not remove the value from HWIT or force you to keep it in an external system. The live value remains on the customer/property record for authorized staff. To use it during a home watch, open the property in HWIT and select the Security tab.
Sensitive is OFF unless you turn it on. Choosing one of the gate, lockbox or alarm Customer fields switches it on for you automatically. Everything else you must set yourself, including:
- Wi-Fi network passwords
- Safe combinations
- Garage keypad codes saved as a Note rather than a Customer field
- Anything else you wouldn’t want printed in an email
A field saved as a Note is never made sensitive automatically, even if the question is obviously about a password. Check the switch.
You can turn on both Required and Sensitive — that’s the right setting for something like an alarm code you must have. The switch is relabelled “Required (only when nothing is on file)” to explain how it behaves: if you have nothing on file yet, the customer can’t submit without entering it. Once a value is on file, leaving it blank is accepted and keeps what you already had, so a customer is never made to re-type a code you already hold.
9. The Contacts block
Section titled “9. The Contacts block”This is how you collect people. Click Add Contacts and you’re done — there is nothing to configure except an optional Intro text box.
On their page, the customer sees a card for each contact already associated with that customer/property. Property contacts are listed first, but service providers and other regular contacts can appear too. On each card they can update the first and last name, email, phone and alternate phone, and set the Relationship / role. For homeowner/property-contact cards, they can also tick whether that person Receives reports, Receives invoices, or gets Portal access.
They can also tap Add another contact to add someone new — a spouse, a second owner, a housekeeper, a preferred plumber. New contacts default to “Homeowner”; if the customer changes that description, they’re saved as a regular (non-property) contact.
Contacts block vs. a Contact field — these are different tools and the difference matters:
| Contacts block | Contact field (Writes back to → Contact) | |
|---|---|---|
| Set-up needed | None | You must pick which specific person it updates, every time you send it |
| Can the customer add a new person? | Yes | No |
| How many people? | As many as they want | Exactly one, chosen by you in advance |
| Good for | Second owners, spouses, contractors, anyone | Rare — correcting one known contact’s phone number |
For nearly everything, use the Contacts block.
10. Publish
Section titled “10. Publish”When everything looks right, turn on Published at the top. Only published templates can be sent.
If the switch flips straight back off, a message appears at the bottom of the screen telling you what’s wrong. The system refuses to publish a template that would break for the customer, and it checks for:
- No items at all — add at least one.
- A field set to Customer or Contact with no column picked in the second dropdown.
- A field set to Note with no Description picked.
- A
selectfield with no choices typed in. - An Agreement that doesn’t require a signature and electronic consent.
Read the message, fix the named field, and try again.
Previewing your template
Section titled “Previewing your template”You don’t have to send anything, or even publish the template, to see how it looks. There are two places to do it:
From the template editor (fastest, and works on an unpublished draft):
- Click Preview at the top of the editor, next to Tokens.
- Search for and pick a customer whose real information you want to preview with.
- If the template has any Contact fields, assign a contact for each one — same as the Send dialog. (Contacts blocks need nothing.)
- Click Open preview. A new tab opens showing exactly what that customer would see — your wording, their real non-sensitive information filled in, and the signing step for an Agreement.
From the Send dialog: the same Preview button appears there too, using whichever customer and template you’ve already picked — a quick final check right before you actually send.
The preview page is clearly marked and is view-only. Nothing you do on it is saved anywhere, and the link stops working after 30 minutes on its own.
Before you publish — a checklist
Section titled “Before you publish — a checklist”Run through this once. It catches nearly every problem people hit.
- Template name has no stray space at the front, and reads well to a homeowner.
- Description reads well to a homeowner (they see it), or is blank.
- Every field label is unique — no two “Other comments”.
- Every field’s second dropdown is filled in.
- No two fields point at the same Customer field, Note, or Contact field.
- Every
selectfield actually has choices typed in. - Every password, code and combination has Sensitive turned on.
- Only one Contacts block.
- No individual fields collecting a second person’s name or email — use the Contacts block.
- Yes/no questions are
select, not free text. - Published is on.
- You used Preview to check the layout with a real customer’s data.
- You sent a real test to yourself and filled it in end to end.
That last one is worth the five minutes every single time.
Sending a form or agreement to a customer
Section titled “Sending a form or agreement to a customer”- Open the customer’s screen.
- Go to the Forms & Agreements tab.
- Click Send Form / Agreement.
- Pick the template, confirm the customer’s email address, and click Send.
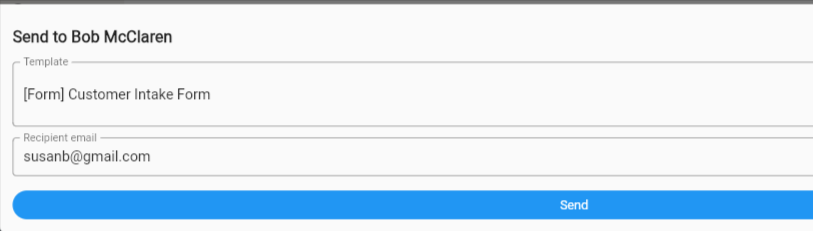
If your template contains any Contact fields, an Assign contacts section appears here and you must choose which person each one updates before it will send. (Contacts blocks need nothing.)
The customer gets an email with a button to open their personalized link. That same tab keeps a history of everything you’ve sent, with its status:
| Status | Meaning |
|---|---|
| Sent | Emailed, not opened yet |
| Opened | The customer has opened the link |
| Processing | They’ve hit Submit and it’s being saved |
| Submitted | Done |
| Expired | The link ran out of days before they finished |
Each row also has a Resend fresh link button. Use it if the link expired or the customer lost the email — it issues a new link and stops the old one working.
After the customer submits
Section titled “After the customer submits”Once the customer taps Submit:
- Their mapped answers and contact updates are saved to the customer record.
- A PDF copy is filed under the customer’s Attachments, in a Forms folder (for forms) or an Agreements folder (for signed agreements).
- You receive an email letting you know it’s done, listing what changed.
If anything couldn’t be saved onto the customer record — for example a field that points at a note you deleted after sending — that email shows an orange warning box listing exactly which answers to enter by hand. The answers are never lost; they’re always in the PDF and the form history.
Frequently asked questions
Section titled “Frequently asked questions”Getting started
Section titled “Getting started”Do I have to build a new form for every customer? No. You build a template once and send it to as many customers as you want.
Can I copy an existing template instead of starting over? Yes. Click the copy icon on the template’s row in the Forms/Agreements tab and confirm Duplicate Template. You get a full duplicate named ”…(Copy)”, unpublished, that you can edit freely. This is the safest way to try changes to a template you’re already sending out.
Can I see what the customer will see? Yes — click Preview at the top of the template editor (or in the Send dialog), pick a customer, and it opens exactly what that customer would see in a new tab. It works even before the template is published, nothing you do on it is saved, and it’s the fastest way to check your work as you build. See Previewing your template above. For a full end-to-end test — including the PDF and notification email — send it to yourself once before it goes out to real customers.
Can the customer complete it on their phone? Yes. The link works in any web browser, and the signature pad works with a finger.
What does the customer do differently for an Agreement? They read the agreement, type their name and email, accept the electronic signing consent, confirm they agree, draw their signature, and tap Submit. The standard signing wording is already filled in when you create an Agreement.
People, owners and contacts
Section titled “People, owners and contacts”How do I add a second homeowner, or a spouse? Add a Contacts block. Do not build fields like “Second owner name” and “Second owner email” — the Contacts block already does this properly, lets the customer add as many people as they like, and saves each one as a real contact on the record. Individual fields cannot create a new person.
Where do I put an email address? In the Contacts block. There is no email option under Customer because emails belong to people, not properties.
I already added second-owner fields. What should I do? Delete them and add a Contacts block. If any of them are set to write to Customer Name, delete those first — every one of them overwrites the customer’s name when the form is submitted.
What’s the difference between the Contacts block and a Contact field? The block shows the contacts already on the customer/property record and lets the customer edit them and add new ones, with no set-up. A Contact field updates one single person that you choose in the Send dialog, every time you send, and can’t add anybody. Use the block.
Can I have two Contacts blocks — one for family, one for contractors? No. Only the first one appears; the second is silently ignored. Put both sets of instructions in the first block’s Intro text.
The customer added their plumber — will that clutter my property contacts? No. New contacts default to “Homeowner”; if the customer changes the description to something else (Plumber, HVAC, Landscaper), they’re filed as a regular contact rather than a property contact. They may still appear in the Contacts block next time because the block shows all contacts for that customer.
Tokens and text
Section titled “Tokens and text”Do I need tokens? Almost certainly not. If you’re collecting information from the homeowner, skip them entirely. They’re for putting details you already have into wording the customer reads — mostly used in agreements.
Where do tokens go? Inside a Text item only. Typing one into a field’s Label or Help text does nothing.
I typed a token and nothing appeared.
A token that isn’t spelled exactly right comes out blank — there’s no error
message. Copy it from the Tokens button instead of typing it, and check for a
missing {{ }} or a stray letter.
Can I merge a gate code or alarm password into my text?
No. Those always print as XXX, on purpose, and it can’t be turned off.
What’s a Merge key for? Repeating a field’s answer elsewhere in your wording. It’s an advanced option that almost no template needs. Leave it blank.
The look of the page
Section titled “The look of the page”Can I edit the header? Depends which part. Your logo, company name, phone and email come from Company Settings and are the same on every form. The big title is the Template name. The grey line under it is the Description. For any other wording, add a Text item and drag it to the top.
Is the Description private? No. The customer reads it, right under the title. Don’t use it for notes to yourself.
Can I add my own headings and sections? Yes — use Text items. Long forms are much easier to fill in when they’re broken into sections.
Building fields
Section titled “Building fields”My dropdown is empty except for ”— select —”. The field has no choices. Edit it and type your options into Choices, one per line. If the field is also Required, an empty dropdown makes the form impossible to submit — the customer can never finish it.
Why won’t the Published switch stay on? Something in the template would break for the customer. A message at the bottom of the screen names the problem — usually a field missing its second dropdown, or a dropdown with no choices. Fix it and try again.
Why did the customer’s name get replaced with something odd? Because more than one field was pointing at Customer Name. When two fields write to the same place, the last one wins. Check that each destination is used by only one field.
Can I make an alarm or gate code mandatory? Yes — turn on both Required and Sensitive. A customer who has nothing on file must enter it; a customer whose code you already hold can leave it blank and still submit, and you keep the code you had.
Should I mark a Wi-Fi password Sensitive? Yes. Anything you wouldn’t want printed in an email needs the Sensitive switch turned on by hand. Only the gate, lockbox and alarm Customer fields switch it on for you — a password saved as a Note never does.
The customer form says a sensitive value is protected. How do I use it during a home watch?
Open the property in HWIT and select the Security tab. The value is still available there to authorized staff. It is protected from the customer-facing form, PDF, and notification email; it is not meant to be retrieved from outside HWIT.
Is a sensitive value removed from the property record because it is redacted?
No. Redaction applies to public/customer-facing outputs and notifications. The live value remains in HWIT’s customer/property record for authorized staff.
Can I turn a Form into an Agreement? No. That’s fixed when you create the template. Create a new Agreement instead.
Links, sending and results
Section titled “Links, sending and results”I already have some of this information. Will the customer see it? Yes — non-sensitive fields are pre-filled so the customer only has to correct what’s changed. Any field you marked Sensitive is shown blank for security, with a note that a value is already on file.
What if the customer never opens the link? The link expires after the number of days you set (14 by default). Use Resend fresh link on the history row to send a new one.
I don’t see Send or Resend. Those buttons are only shown to users who are allowed to send forms and agreements. Ask an admin to send it for you or update your user role.
Can a link be used more than once? For a Form, yes — the customer can go back and submit again any time before it expires, and the latest submission replaces the previous one. For an Agreement, no — once it’s signed, it’s final. To get a new signature, send it again.
If I change a template, does it change forms I’ve already sent? No. A form the customer is filling out uses the version that existed when you sent it. Your changes apply to future sends only.
Where do signed agreements go? Into the customer’s Attachments, under the Agreements folder, as a PDF with a signature certificate page recording the date and time signed, the email it was sent to, and the signature itself.
The email said some answers couldn’t be saved. Did I lose them? No. They’re in the PDF and in the form history. The warning means the answer couldn’t be written onto the live customer record — usually because the note it pointed at was deleted after the form went out. Enter those by hand, then fix the template.