Client Requests and In Residence Requests
Your clients can ask for extra services right in the Customer App: a car start, mail forwarding, airport pickup. They choose from a list you set, at your prices.
There are two kinds of request:
- In Residence Request — when a client adds or changes a stay, the app offers your stay services, like Stock the fridge before we arrive.
- Client Request — any time, from the Requests tile in the app.
Each request arrives in the web app as an Action. You turn each item into a Task. The Task is what gets done, and what gets billed.
Set it up
Section titled “Set it up”You need to be an Admin.
A. Choose what to offer
- Go to Lists and open the Item Codes tab.
- Open an item, for example Auto Start/Drive.
- Under Offer to owners, turn on:
- Offer with an In Residence stay, and/or
- Offer as a request.
- Optional: write an Owner description. This is what the client reads when they tap Show details.
The price the client sees is the item’s Rate. Do this for each item you want to offer.
B. Turn it on for your clients
- Go to Settings and select the Integrations tab.
- On the Customer App row click Manage Customer App.
- Turn on Offer services when a client adds an In Residence stay, Let clients request services, or both.
You only see these switches while Customer App Available to Customers is on.
When a request comes in
Section titled “When a request comes in”- You get a phone push: New In Residence request or New client request.
- The home page shows New owner requests under Needs attention. Click Review.
- On the Actions screen, the Owner requests tab lists every open request.
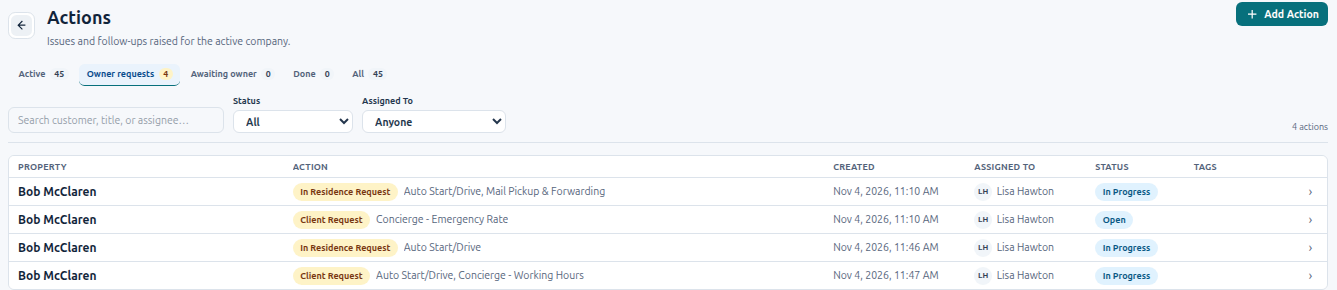
The request is assigned to your company’s Primary User, or an Admin if there is none.
Work a request
Section titled “Work a request”-
Open the request from the Owner requests tab.
-
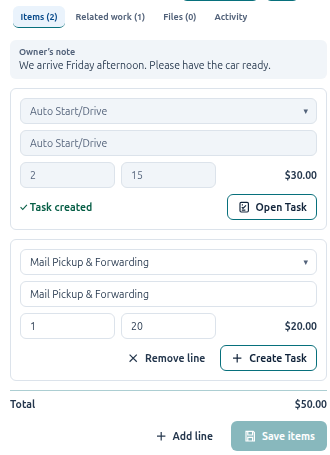
The drawer opens on Items. You see the client’s note and each item with its quantity and price. Change a quantity or price here if you need to, then click Save items.
-
On an item, click Create Task.
-
The Task form opens filled in: title, billing item, rate and quantity. Pick the date and who does it, then click Create Task.
-
Do the same for each item.
The item now shows ✓ Task created, and the request moves to In Progress. The client sees Scheduled.
When all the work is done, Resolve the Action. The client sees Done.
Need the client’s OK on a price?
Section titled “Need the client’s OK on a price?”Click Request Approval. The amount starts at the request total. Change it if your price is different, then send. The client answers from the email or the app, as with any approval.
In Residence Requests on the stay
Section titled “In Residence Requests on the stay”When you open the stay to approve or change it (Scheduling › In Residence), its requests are listed under Requests. You can click Create Task there too. Closing the Task brings you back to the stay.
Approving the stay does not accept the requests. You handle them separately.
Good to know
Section titled “Good to know”- The client can change or withdraw a request until you start on it. After that, they message you instead.
- Prices are fixed when the client asks. Changing an item’s rate later does not change requests already made.
- The client sees the items, prices, total and status: Received, Approval needed, Scheduled, Done or Closed.
- The technician’s phone shows the request as a normal Action.
Questions
Section titled “Questions”A client asked for something you don’t offer. What now? They can write it in the note, or message you. Add the item on the request’s Items tab with Add line.
Can I turn it off again? Yes. Turn the switches off in Manage Customer App. Requests already made stay in your Actions.