
Adding a Schedule
Schedules are easily set up in the system, which will generate blank reports in your reporting application for every upcoming visit.
Schedules can be repeating, in which case the system will continually manage new reports for you until you stop the schedule, or it can be OneTime in the case you wish to put a single event on the calendar, like meeting a Plumber.
To set up or edit a Schedule, go to the Schedule screen and either click on the > next to an existing Schedule or click the + to add a new schedule.
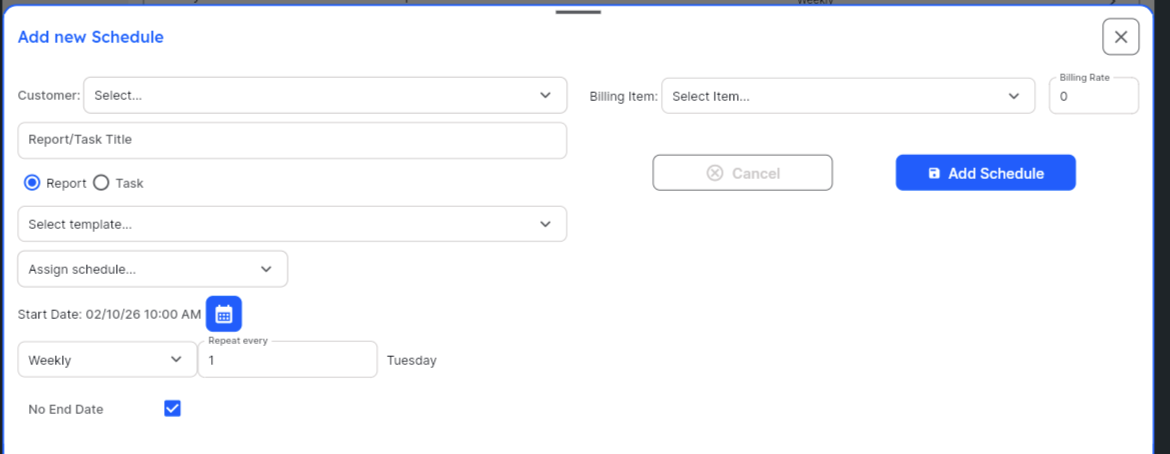
To add or update a schedule, you need to fill in the fields as follows:
- Customer: select the customer from the dropdown list
- Report Title: Enter the title you want to use on the report every time that a report is created. Examples could be: Smith Residence Home Visit, Smith Monthly Car Drive, Smith Quarterly Air Filter Change, etc.
- Report/Task: Select if you are scheduling a Report or a Task.
- Select Template: if you are scheduling a Report, you must select a report template to use to create the report for this schedule. If you are scheduling a Task, then no template is required and this field will not appear.
- Assign Schedule: select which employee will be assigned the report when created
- Start Date: is a required item showing when you wish for the schedule to start. Only dates in the future are allowed, so if the schedule is ongoing please enter the next scheduled visit.
- Recurrence: You can select a recurrence interval of Daily, Weekly, Semi-Monthly, Monthly, or One Time. For every recurrence you can choose a Repeat Every interval as well, which works together with the Recurrence to determine how frequently the report will repeat. As an example, setting the Recurrence to Weekly and the Repeat Every to 2, will create a schedule that repeats every two weeks. Setting the Recurrence to Daily, and the Repeat Every to 90, will create a schedule that repeats every 90 days. Semi-Monthly works a little different — semi-monthly is defined as happening exactly 2 times per month on a particular weekday. The weekday is determined by the Start Date entered, and then you specify whether it will be the 1st and 3rd week containing that weekday, or the 2nd/4th week of the month containing that weekday. As an example, if your start date is a Wednesday, and you select the 2nd/4th option, the scheduler will create visits on the 2nd Wednesday and the 4th Wednesday of each month. (Please note that Semi-Monthly schedules require having Advance Scheduling turned on).
- No End Date or End Date: If you wish the schedule to repeat until you delete it select No End Date. It will continue until you edit the schedule and add an end date or delete it completely. If you wish for the schedule to only repeat for a certain period of time, uncheck the No End Date checkbox and enter in your desired End Date for this schedule.
- Auditor Hint or Notes: the prompt will vary depending upon your reporting system. If you are using MonitorQA, whatever you enter in this field will appear in the reporting app in the “Auditor Hint” textbox. If you are using SafetyCulture, this is a Note field that will appear in the HWIT app, but does not appear anywhere on the SafetyCulture report.
- Billing Item: If you want completed reports to create a Billing Item, select the Item from this dropdown and enter the Billing Rate next to it. Upon completion of each report that this Schedule generates a new Billing Item will be written (see the Invoicing documentation for more information on using Billing Items).
Some notes about how Schedules work in the system:
- When saving a Schedule that is designated a Report, it will immediately create a new report dated the Starting Date. Subsequent reports are created after each report is completed.
- If you create a weekly Report/Task starting March 1, you will find an item in your open reports list for March 1 and if a Report, will also find an uncompleted report in your reporting application dated March 1. When completing the March 1 Report/Task item, a new item dated March 8 will immediately be created and if a Report, will sync new brand new report to your reporting app.
- If you modify a schedule, the system will delete any existing uncompleted reports and create a new one based on the Start Date and Recurrence you have selected.
- Scheduled Reports/Tasks are “self correcting” — meaning that they will adjust the dates automatically when you complete a Report/Task. As an example, you have a Weekly report each Tuesday, but on a particular week you complete the report on Wednesday — in that case future Reports/Tasks will continue to be created on Wednesdays. If you wish to move it back to Tuesday, just complete the Report/Task on Tuesday and all following Reports/Tasks will adjust accordingly. You can use this if you need to adjust a bi-weekly schedule and move the dates in by a week as well — the system will create the next Report/Task 2 weeks after you complete the current report.
- You cannot move a Schedule to a different client — you will need to delete the existing schedule and enter a new schedule.